December 22, 2025
Heated Floor Installation: Complete Guide
Learn about heated floor installation, including system types, costs, energy efficiency, and essential maintenance tips for your home.
Learn about heated floor installation, including system types, costs, energy efficiency, and essential maintenance tips for your home.
Heated floors are an efficient way to warm your home, especially in areas like bathrooms and kitchens. These systems work by generating heat beneath your flooring, either through electric heating cables or hydronic systems that circulate warm water. Here's what you need to know:
Whether you're upgrading a bathroom or heating an entire home, heated floors offer comfort, efficiency, and long-term value.
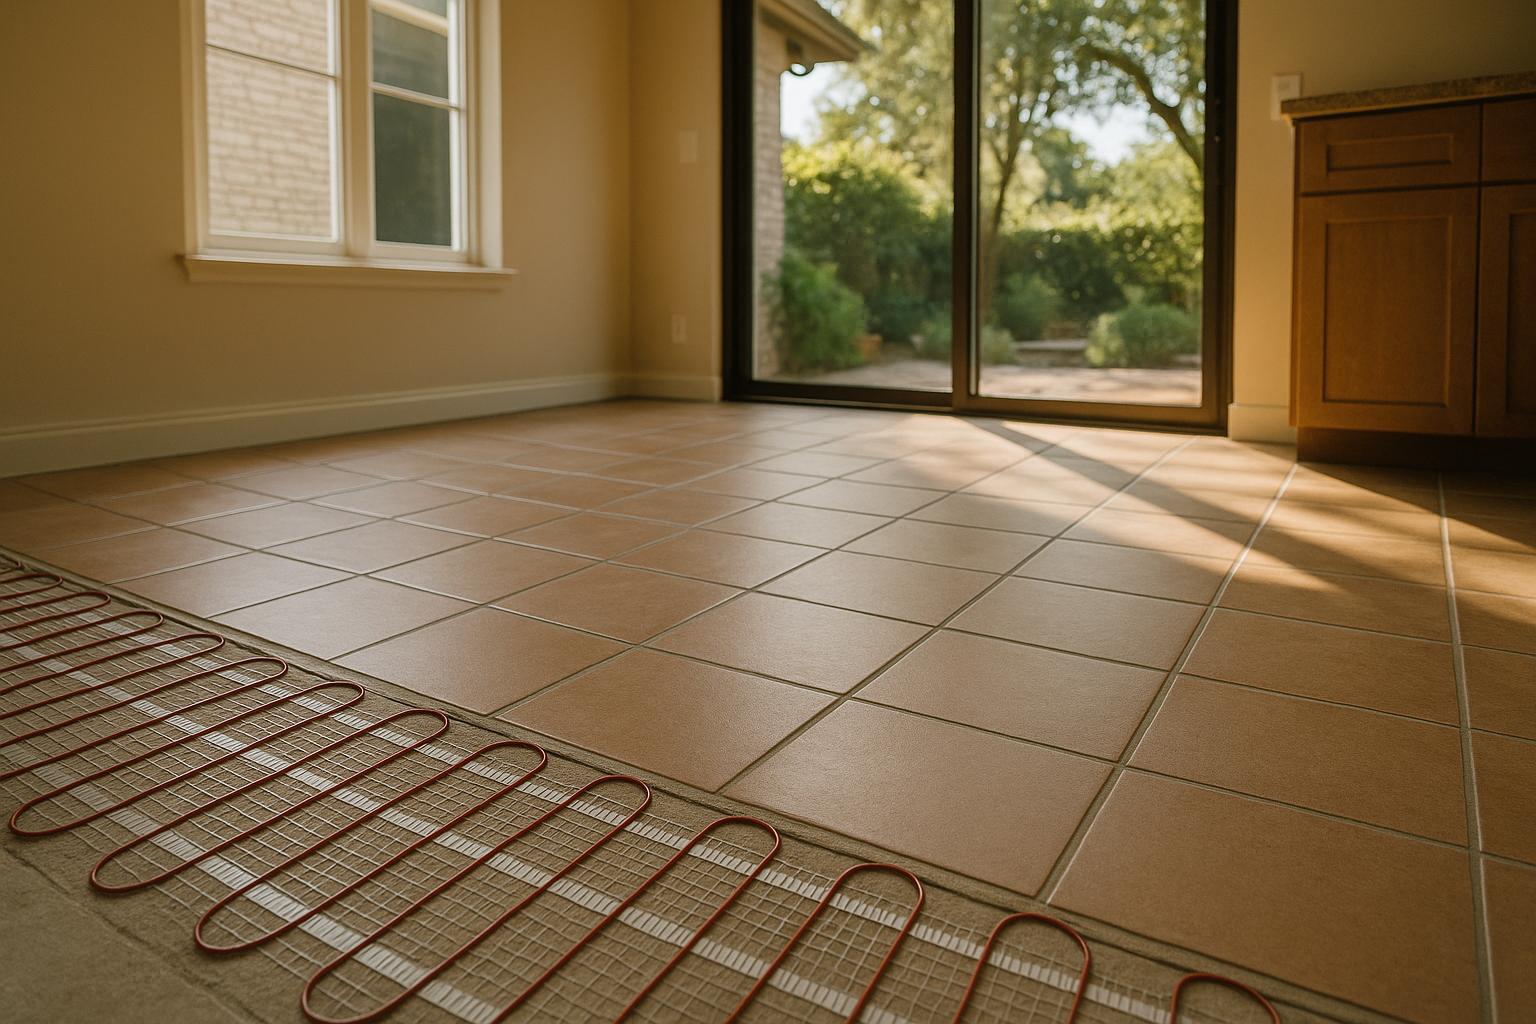
Electric radiant heating systems rely on heating cables or mats connected to your electrical panel. These systems generate low-temperature heat through electrical resistance, making them a popular choice for smaller spaces like bathrooms or kitchens.
There are two main types of electric systems: heating cables and heating mats. Heating cables are arranged in a specific pattern during installation, while heating mats come with pre-spaced cables attached to a mesh backing. The mat option simplifies and speeds up installation since the spacing is already optimized for even heat distribution.
For example, a typical bathroom installation covering 50 square feet uses about 15 watts per square foot, consuming roughly 750 watts in total - comparable to running a small microwave. These systems are connected to a dedicated circuit breaker (usually 15 or 20 amps) and are controlled by a programmable thermostat with built-in floor temperature sensors.
Installation is relatively simple and doesn’t require any plumbing work. The heating elements are thin - about 1/8 inch - so they add very little height to the floor. Most electric systems reach their desired temperature within 30 to 60 minutes of being turned on.
Next, let’s look at hydronic systems, which are better suited for larger spaces or whole-home setups.
Hydronic systems work by circulating heated water through flexible PEX tubing installed beneath the floor. The water is heated by a boiler or heat pump and then pumped through the tubing to distribute warmth evenly.
These systems are ideal for larger spaces or entire homes. For instance, a 1,500-square-foot home with hydronic heating typically operates with water temperatures between 80°F and 120°F, much lower than the 180°F water required by traditional radiators. This lower temperature not only improves efficiency but also makes these systems compatible with modern condensing boilers or heat pumps.
The tubing is laid out in loops, with each loop covering about 200 to 300 square feet. All the loops connect to a manifold, which controls the temperature and water flow for different zones. This zoning feature allows you to heat specific areas of your home independently, giving you precise temperature control room by room.
Hydronic systems take longer to heat up - usually 2 to 4 hours - but they excel at maintaining a consistent temperature due to the thermal mass of the flooring, which retains heat even after the system cycles off.
Now that we’ve covered both electric and hydronic systems, here’s a side-by-side look at how they compare in terms of installation, cost, and performance.
For homeowners in Sacramento, electric systems are often the go-to choice for bathroom and kitchen renovations, where quick installation and focused heating are key. Hydronic systems, on the other hand, shine in whole-home installations or larger areas, where the higher initial investment is offset by lower operating costs and long-term comfort.
Careful planning is essential to ensure your heated floor installation in Sacramento is both safe and up to code. It's not just about comfort - meeting specific safety and building standards is non-negotiable.
Sacramento's local regulations require your heated floor system to maintain an indoor temperature of at least 68°F, measured three feet above the floor on the design heating day. Additionally, the installation must comply with the California Building and Mechanical Codes, as well as Title 15 of the Sacramento City Code. Only approved heating devices can be used - unvented fuel-burning heaters are strictly prohibited.
Once you've ensured your system meets these safety standards, the next step is to gather all the necessary tools and materials to make the installation process as smooth as possible.
Start your installation with a clean, level foundation and pay close attention to every detail.
Once your planning is complete, it's time to get the work area ready for a smooth and efficient installation.
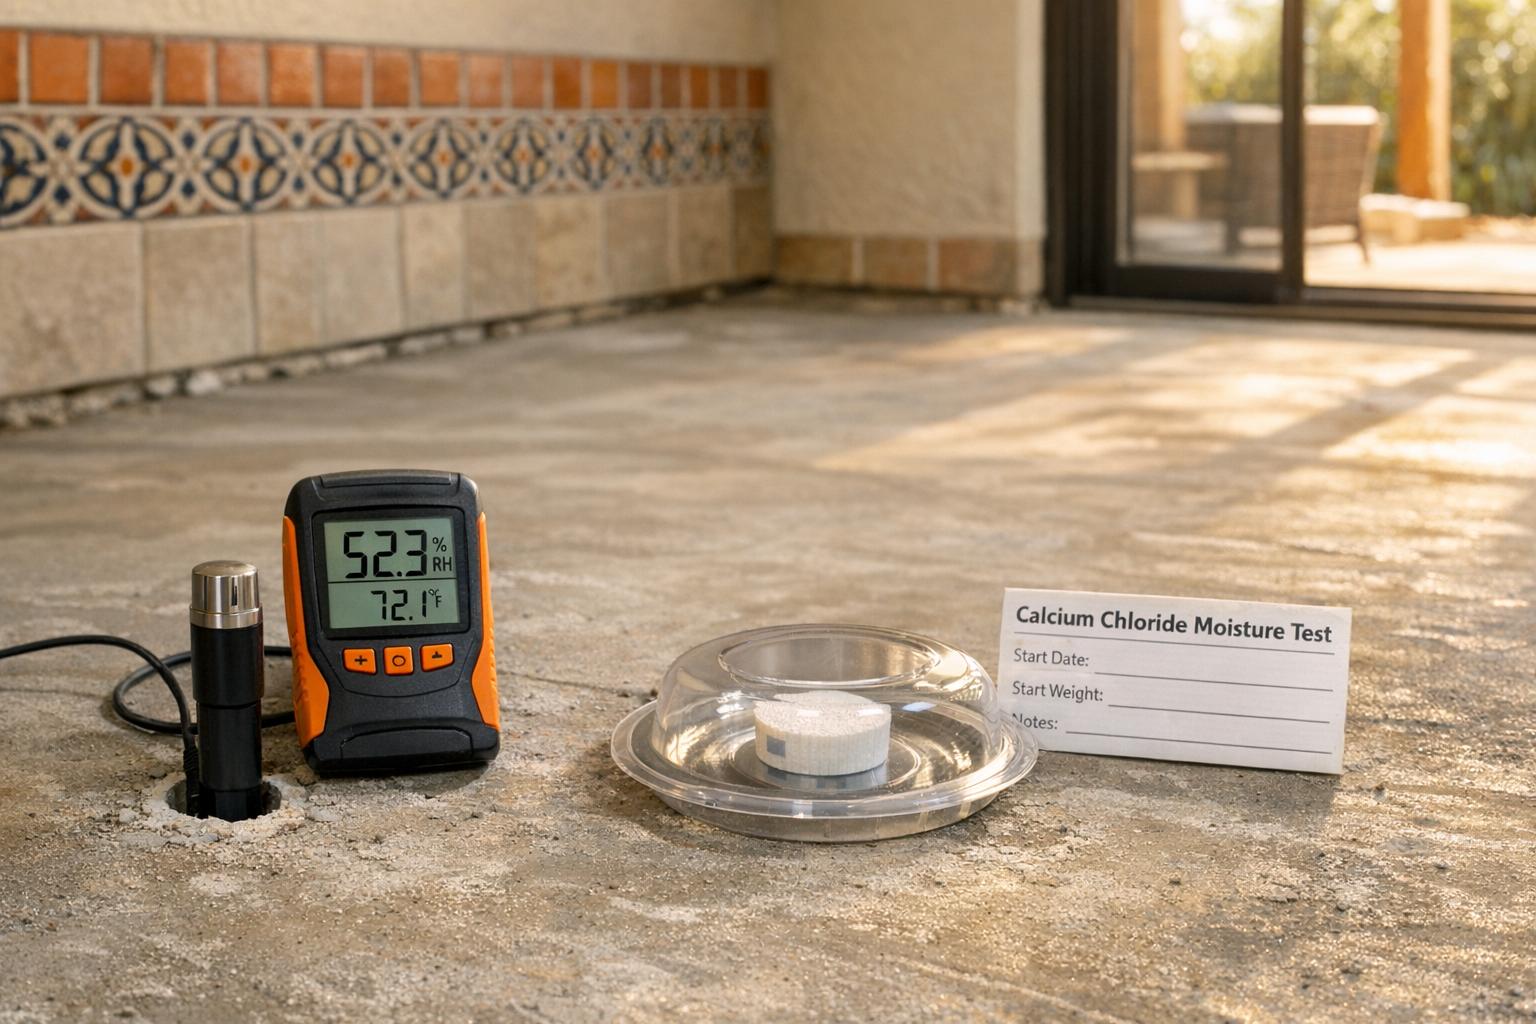
Begin by ensuring the foundation is clean and level - this is critical for the system's performance. Remove any dirt, debris, screws, nails, or other objects that could damage the heating elements. Use a broom or vacuum to thoroughly clean the subfloor.
Carefully inspect the subfloor for any signs of damage, cracks, or uneven surfaces. Address these issues by repairing cracks, smoothing jagged edges, and applying a self-leveling compound where needed.
Make sure your heating system is being installed on a structural floor, such as a concrete base or a suspended timber floor with floorboards.
For concrete floors, this is the stage to lay a damp proof membrane. Extend the membrane about 10 inches up the walls to create a protective barrier. Overlap the joints by roughly 6 inches and secure them with polythene joint tape.
Once the subfloor is ready, move on to installing insulation. Proper insulation improves energy efficiency. Place insulation boards or underlayment over the clean, level subfloor. Use the appropriate tape - aluminum foil tape works well for aluminum-backed boards - to join the boards together. For hydronic systems, add a layer of insulation around the room's perimeter, extending slightly above the planned screed layer. Electric systems typically don’t need edge insulation.
If your insulation boards have pre-built grooves for tubing, arrange them according to the system's layout. Secure the boards to the floor using screws, washers, or adhesive as required.
Finally, keep in mind that the floor height will increase by at least an inch, so plan accordingly for doorways and around appliances.
If you're considering installing heated floors, understanding the costs and upkeep involved is crucial. Here's a breakdown of expenses and tips to help maintain your system for years to come.
On average, installing a heated floor in the U.S. costs around $4,128, with most projects ranging between $1,653 and $6,656. Per square foot, the price typically falls between $6 and $20 for a complete installation. Here's a closer look at costs based on system type:
| System Type | Whole-Home Cost Range | Cost per Sq. Ft. |
|---|---|---|
| Electric | $19,000 - $36,000 | $10 - $15 (materials) |
| Hydronic | $19,000 - $48,000 | $6 - $20 (installed) |
| Geothermal | $9,500 - $27,000 | Varies by location |
| Solar | $8,000 - $19,500 | Varies by system size |
| Propane | $2,400 - $2,900 | Most affordable option |
Room size plays a big role in determining material and labor costs. The type of system you choose also affects the price. Additionally, preparing the site - like leveling the subfloor or making repairs - can increase the overall expense.
Labor costs vary depending on your location and the installer’s expertise. For instance, in cities like Sacramento, rates may be higher due to local demand and stricter building codes. To save money, you might consider heating only the most-used areas of your home instead of installing a whole-house system. Doing some of the prep work yourself can also help cut costs. For example, DIY site preparation can reduce expenses, and installing an electric system yourself could save around $4 per square foot, while a hydronic system might save you about $9 per square foot.
Don’t forget to explore federal and local incentives. Programs like the Inflation Reduction Act offer tax credits for geothermal systems, and Energy Star credits or state rebates may apply to solar systems, potentially lowering your upfront costs.
Once your heated floor is installed, regular maintenance will help ensure it performs well for decades.
With proper care, heated floors can last 25 years or more, and some systems may even reach 50 years. This durability makes them a solid long-term investment, but upkeep is essential to maintain their efficiency and lifespan.
Here are some tips to keep your system running smoothly:

When it comes to heated floor installation in Sacramento, selecting a contractor with the right expertise is key to a smooth, reliable system. Skyline Tile stands out with its specialized services and dedication to quality. Below, we’ll explore what Skyline Tile offers and why Sacramento homeowners trust them for their radiant floor heating needs.
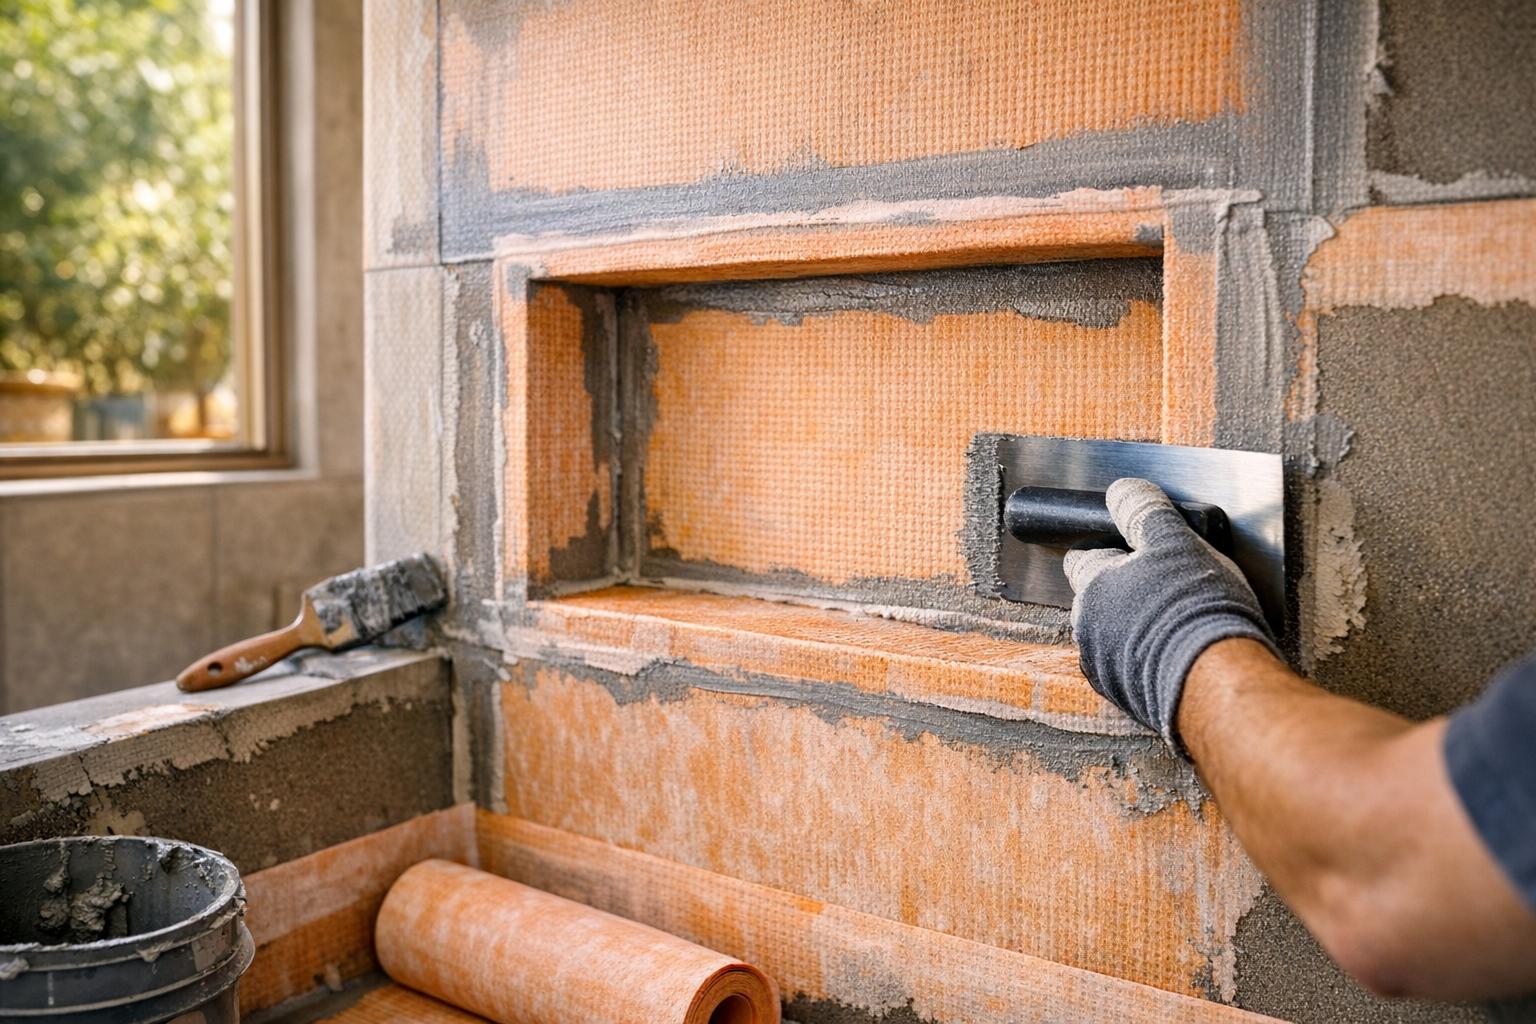
Skyline Tile focuses on radiant heated floor installations, providing both electric and hydronic systems tailored for bathroom and kitchen upgrades across Sacramento. Their installations include smart thermostats, energy-efficient controls, and professional waterproofing integration - features especially important for spaces like bathrooms where moisture is a factor. They also offer in-depth design consultations to ensure your heating system fits your space and budget perfectly.
With over 15 years of experience and more than 200 successful installations, Skyline Tile has earned a strong reputation for craftsmanship. Their deep understanding of Sacramento’s unique requirements allows them to customize each project, ensuring it meets local needs. Plus, they provide a 5-year workmanship warranty, giving homeowners added confidence in their investment. Skyline Tile’s ability to combine functionality with style ensures that your heated floor not only performs well but also enhances your home’s aesthetic. Their expertise aligns seamlessly with every step of the installation process, making your project a success from start to finish.
Heated floors bring a blend of comfort and efficiency to any space, offering an energy-smart solution that can also enhance your home's value. Both electric and hydronic radiant heating systems are estimated to be 20–25% more energy efficient than traditional forced-air systems, which means noticeable savings on energy bills over time. Plus, radiant floor heating keeps occupants comfortable even at temperatures 6 to 8°F cooler than usual, adding to its efficiency.
But it’s not just about energy savings - heated floors can also make your home more appealing to buyers. With warranties lasting 20 to 25 years and requiring little upkeep, these systems are a low-maintenance upgrade that adds long-term value.
To fully enjoy these benefits, professional installation is key. Licensed installers ensure everything is set up correctly, including waterproofing for wet areas, and they follow local building codes to the letter. In Sacramento, homeowners can rest easy knowing expert craftsmanship and solid warranties will deliver reliable performance and add to their home’s worth.
Whether you're revamping your bathroom or giving your kitchen a modern touch, heated floors are a smart way to combine comfort, energy efficiency, and added appeal.
Electric heated floors are incredibly low-maintenance. Once installed, they usually require little attention. At most, you might need to check the wiring connections if something seems off. But beyond that, these systems are built to last and offer reliable performance over time.
Hydronic heated floors, however, demand a bit more care. Since they operate using water circulation and include components like boilers, regular upkeep is essential. Boilers should be inspected and tuned up annually to keep the system running efficiently. Expect to spend about $400–$500 for a boiler tune-up. Additionally, it’s wise to periodically check for leaks or other issues to avoid bigger problems down the road. Routine maintenance not only ensures smooth operation but also helps the system last longer.
The affordability of a heated floor system largely hinges on factors like your home's size, how often you'll use it, and your budget. Electric systems are usually cheaper to install, making them a great choice for smaller spaces or quick renovations. However, keep in mind that their running costs can be higher since they rely on electricity. Hydronic systems, on the flip side, come with a steeper initial price tag but tend to be more energy-efficient and cost-friendly over time, especially when paired with efficient heat sources like gas boilers or heat pumps.
If you're looking to warm up a small bathroom or a single room, an electric system might suit your needs. But for heating larger spaces or achieving long-term savings, hydronic systems are often the smarter pick. Weigh your space size, energy expenses, and heating requirements to determine which option fits your situation best.
Installing heated floors in older homes isn’t always straightforward. For one, uneven or sloping floors can affect how heat is distributed, making installation trickier. You might also need to tackle significant retrofitting tasks, like removing the existing flooring or upgrading the subfloor to ensure the system functions properly. And let’s not forget insulation - many older homes weren’t built with modern insulation standards, which can lead to less efficient heating. High ceilings, common in older homes, can also make it harder to maintain a consistent temperature.
There’s another layer of complexity if the home has historic features you want to preserve. Retrofitting heated floors in these cases can take more time and cost more, as extra care is needed to protect the home’s original charm. Still, with thoughtful planning and the right approach, it’s entirely possible to install a system that not only works well but also respects the character of the home.